Saturday 30 April 2011

Final Animation

Below is a video of my final animation.


Overall I am pleased with the outcome of my animation, although in places it is slightly jumpy due to the tripod/wind when filming. The way the animated areas have worked together I am pelased with, I was apprehensive as to whether they would contrast too severely but I feel they compliment each other well.

End Title Frames

I had decided to use the end beach scene to apply my title information to, simply the project title and my name. I looked at different fonts that I could use and ended up choosing to use hand drawn, lose Arial as my type face, I experimented with solid, typed typefaces but decided it was important to keep the running theme that I had used through the project, and use simple line drawings... 

Here are the stages I went through to get the final 30 frames:


I began by loosely tracing the letters I needed in order to create the title page, I then scanned them into Photoshop and changed the contrast etc..


I selected the letters individually and placed them onto the background, creating a seperate layer for each one; this would later enable me to 'hide' the layers in order to save the frames as JPegs showing each letter at a time...


I played around with colours and layouts until I found the one I was most happy with...


At this point I had an idea, I was wanting to do something different, which tied the rest of the frames in with this one, so manipulated and moved the HAT and ICE CREAM which played large roles throughout the animation and turned them into the word 'TO' I was really happy with the way this turned out and thought it tied the frames together well and added a bit of colour, interest and focus to these final frames.


To create the white board effect of each letter coming on one after another I simply 'hid' the layers I didnt want to be seen and saved the image as a JPEG, working my way from the P of Print to the N of Wharton.

Composition Continued..

Below is the full 287 frames, I had problems on After Effects however; I have 287 images, so at 12 frames per second this should last 23.9 seconds - how whenever I played it it only lasted 10 seconds! So below the video is supposedly at 6 frames a second, which lasts just over 20 seconds.. The bird and end title just need to be added now and then it should hopefully be complete after a bit of tweaking!


Thursday 28 April 2011

Animation Composition

I began by creating the animated pieces on photoshop after scanning them in and then adding colour. I then had to apply these individually to each slide, to do so I used photoshop and used to layers tool to be able to place the images in the correct places as I went through the individual frames. I used the lassoo tool to be able to make the ice cream fit in the characters hand, making the ice cream opaque in order to cut the shape out accurately.


I began with the simple background scene and character..


Then added the hat, resized and positioned..


I then added and positioned the ice cream in front of the hand.. 

I made the ice cream transparent and using the lasso tool removed the section of the ice cream which should be hidden behind the hand of the character..


Press delete.. 


I had to repeat this for each individual frame!

First frame: 


Above you can see clearly how I have cut around the characters hand to create the effect of the character holding the ice cream... Below is the first 100 odd frames, played at 12 frames per second, the bird is yet to be added!


Wednesday 27 April 2011

The Scene/Character Photoshoot

I went to the beach and took my chosen character with me, I used a 1/2 split scene of the beach and sky, I dressed my character in typical beach wear, shorts and a stop. I used a darker top as it showed a better contrast compared the the background and I found during experiments that white left a lot of glare during these sunny days..

Here is a sample of some of the 300+ shots that I took in an index form, I am using this to draw on the ice cream etc to make sure timing will be correct.


I took a sample section and took the key frames to work out timings for important events during the 30 second animation, here is an example of this:


Here are the 300+ frames and any necessary annotations I added before creating the animation...


Below is a short section of the photographs in action as the base layer of the animation, once these have all been changed to 72dpi (which is taking such a long time) then the other images can be applied and positioned:


(12 frames per second)


Further Development

Character Choices:

I created a brainstorm to decide on my final character, I looked at ages, characteristics and so on. I decided on a male character as I though a woman with long hair would be very difficult to  photograph for stop motion as her hair would be blowing, also I thought a side profile may not be as acceptable of a woman as of a man.


Once I had finally decided on my character, I needed to look at how I would incorporate the 3 main images onto the photo's. I had decided to Photoshop these on at a later date to create a more humorous, light piece. I thought it would also add depth and show more skills and hopefully make it more interesting than a simple animation using a stream of photographs. I had my mind set on hand drawing the pieces and did a bit of research by looking at existing images and types of the different icons I had chosen to use. I looked at ways they were portrayed/drawn and common photos/images that represent them, I then chose the most important and relevant ones I found and created a small mind map to collect all my ideas into one place:


I then drew my final 3 images and scanned them into Photoshop where I edited the contrast etc to create a simple line drawing, for the bird I created 9 sequential images which would be played to create the flying movement of the bird, as demonstrated below...


(Bird/Ice Cream Line Drawing)

Bird Animation:

I used After Effects to create a simple 10 frame slide of the birds wings going from top to bottom, obviously this would continue up and down through the duration of the animation...


10 frame experiment:


The movie splits into 10 frames at a rate of 12 frames per second and shows the basic principle and flow of the bird flying which will be placed in the animation I am making, it will also fluctuate in size as it will increase as it flies towards the character/camera show and then out of the scene again.. Hopefully all will go to plan!

Chosen colours for images:


After experimenting with colours above are my final choices, I experimented with adding textures too but decided against them in the end...

Monday 25 April 2011

Idea Development

After presenting my storyboard I decided to focus more on the technique I wanted to use for my animation, I eventually decided on using photographs and incorporating some hand drawn images onto that. I began looking at the type of character I wanted to use and decided on a final character. 

I began looking at how I wanted to character to move and did some practice pieces using 12 frames per second just to look at possible outcomes. Below are the short stop motion animations I created:


(Low quality due to difficulty uploading bigger files etc)

I looked at the character walking, and found that this looked quite unnatural due to having to stop/start continuously as I took the photographs.. I then looked at the possibility of the character gliding, similar to some pieces I had come across on YouTube, I felt this idea worked better and would like to continue with this as I progress through my animation...

Bird Flying


I looked at some birds flying on YouTube and found a sketched animation which I thought worked really well, its probably a lot more advanced than what I had wanted to do, but I felt it was important to look at such examples in my research..

Tuesday 12 April 2011

Storyboard

I began to put my story board together based on 2 of the earlier themes I had looked at; the hat and the ice cream. I'd already decided the beginning, middle and end so now had to fit what happens in between into the time scale.

I began by breaking down the storyline into 30 x 1 second frames to see if it could realistically fit and how etc.


I then looked at the key frames which would outline my story most appropriately for presentation, giving the important scenes/actions within the 30 second animation..

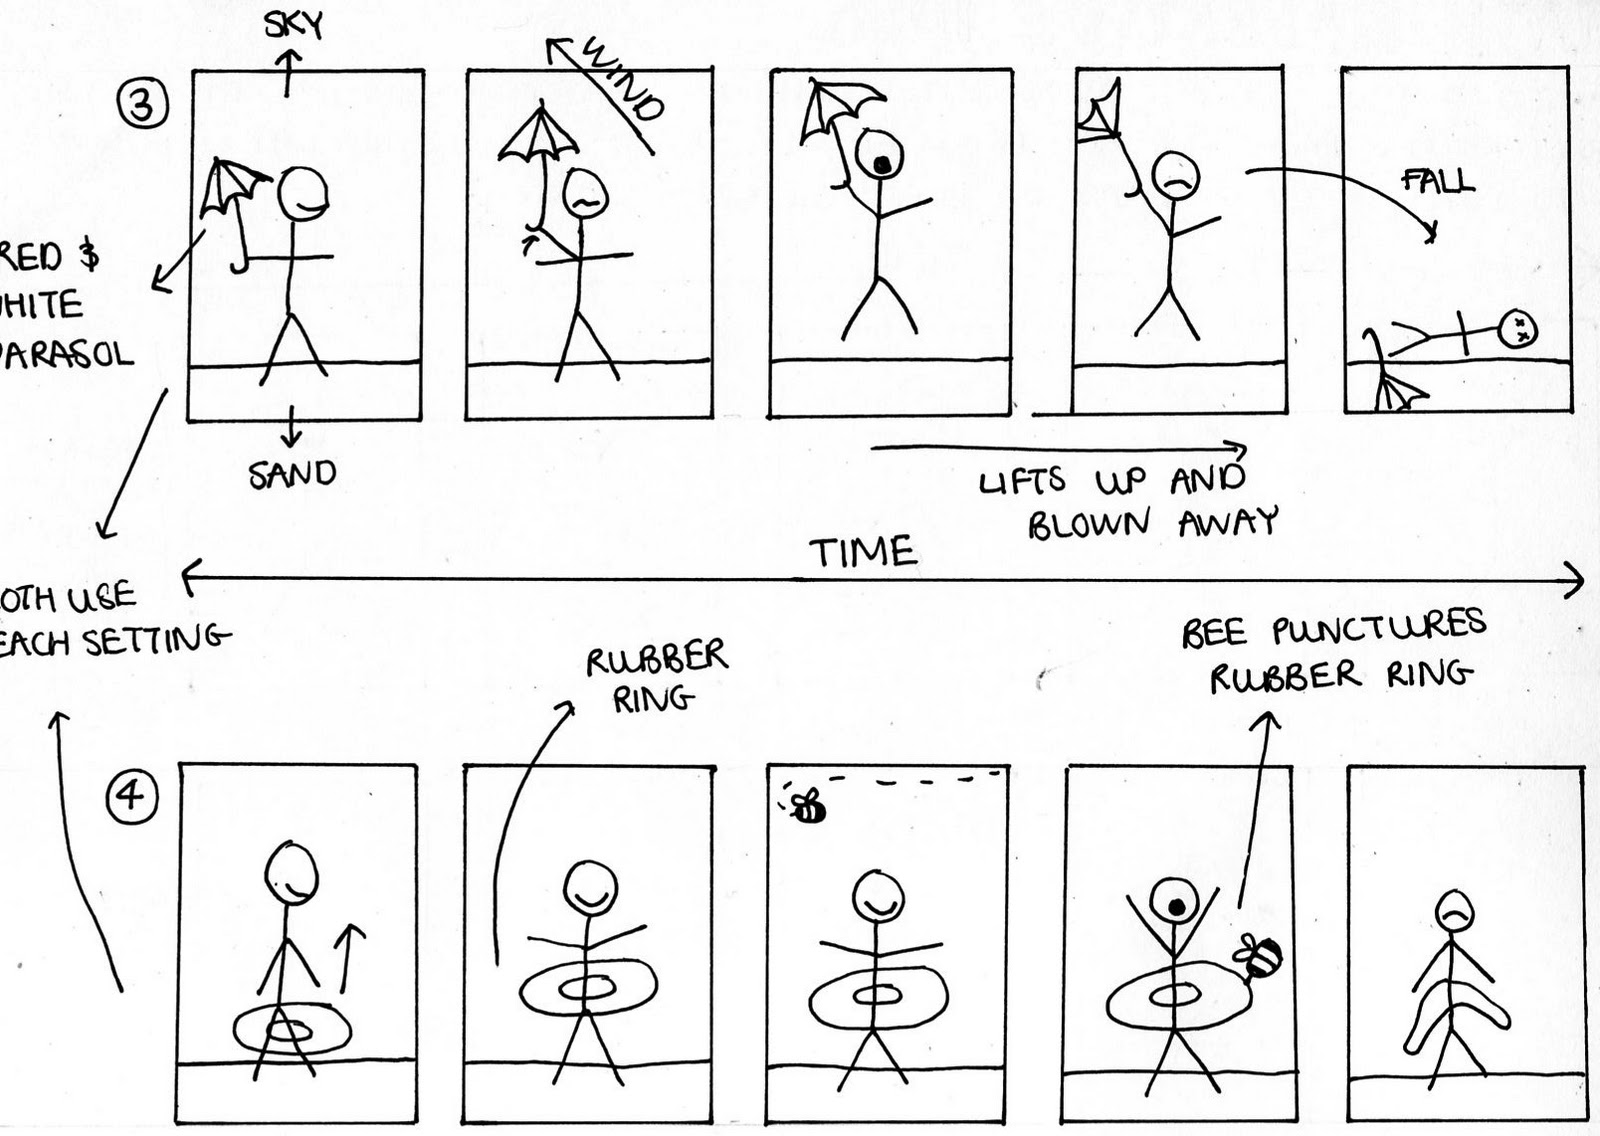
Below I used the given Storyboards to slot my story into, I chose to use 12 key frames to represent my story. I have also included some approximate timings which I intend to aim for when creating the animation.


I then re-drew these key frames into my sketch book and scanned them in to create a linear view of the 30 second animation:

Key Frame 1 (Seconds 1 - 3)
Character walking along a beach scene holding an ice cream, bird in the top left corner flying..

Key Frame 2 (Seconds 3 - 6)
Character continues to walk, but bird begins to swoop down towards character and ice cream..


Key Frame 3 (Seconds 6 - 8)
Bird has swooped in fully and knocked ice cream out of characters hand and onto the floor..


Key Frame 4 (Seconds 8 - 11)
Ice cream is out of shot, character continues to walk along beach scene..


Key Frame 5 (Seconds 11 - 14)
As character is walking, hat begins to blow off due to wind..


Key Frame 6 (Seconds 14 - 17)
Character chases hat along beach scene in order to try and catch it..


Key Frame 7 (Seconds 17 - 20)
Character fails to catch hat and returns to original position at centre of frame, continues to walk along the beach scene.


Key Frame 8 (Seconds 20 - 23)
As character continues to walk a second character enters the scene holding two ice creams..


Key Frame 9 (23 - 25 Seconds)
the two characters begin to talk, which will be communicated through speech bubbles as not to disrupt the music - images may pop up in the speech bubbles such as ice creams etc..


Key Frame 10 (Seconds 25 - 26)
Second character gives original character one of their two ice creams and they both begin to walk along the beach together..


Key Frame 11 (Seconds 26 - 28)
Camera stop moving but characters continue to walk - second character exits screen left so original character is left alone on the screen, continuing to walk along the scene until they also exit screen left..


Key Frame 12 (Seconds 28 - 30)
No characters are left on screen, empty scene and then title screen (name, project etc)

Monday 11 April 2011

Possible Methods of Animation

So far, I seem to have only come across stop motion animation using photographs that have inspired me, before I become to closed minded and focus down this particular route I would like to have a look at some other techniques and methods that I could use, such as a flip book, white board style animation, computerised methods and so on.

Below are a few examples of these methods, particularly ones that inspired me and that I could see being used for my storyboard concept, once I have finished my storyboard I intend to try several methods in order to chose my final method...

Flip book


I really like the concept of this, and think it could possibly work for the animation of my character, however it is a very common and maybe over used form of animation and I feel I would like to use something I am less familiar with.

Clay:

This method would lend itself to all different shapes and sizes of characters, it would also mean the use of a variety of colours and means I could create any props that I wanted. It would also be a lot easier to create the bird swooping in etc than using photographs as it would be impossible to get an actual bird to carry out these actions.

Drawing:

I really really like this concept, so far I have been using a stick man to represent my character, as I am unsure what end form he will take, however this idea looks interesting, and could easily have some colour applied in the background and foreground too. I would like to develop this method further during the next stages after I have completed my story board and narrative to experiment and discover whether or not it could be an end solution.

Research

While I was browsing YouTube to look at different techniques I came across this video below:


In this stop motion animation, using photographs rather than illustration etc,  the clever build up of photographs must have taken a huge amount of time, planning and organisation. I really like the use of the characters side profile which is something I have already looked at and something I would like to develop within my own animation. As you can see from my ideas so far I have focussed on the idea of a character walking continuously along a beach, which has a similar concept I feel to the beginning of the animation above

To try and recreate this idea I created a short (one second), 12 frame animation using photographs of a person simply taking a full step, from extension to extension. Although it isn't a great, steady piece I just wanted to see how it would work and how it would go through After Effects and come out the other end... Below is the short outcome:


This idea of continually walking will be the main theme in my storyboard, the idea of the character walking along the scene and different things happening to them e.g hat blowing off/loss of ice cream etc. If I do decide to use photographs as my main medium then I will need to work out a way to create the bird/hat scenes - (could add in later using animation, flick boot idea?)

Tuesday 5 April 2011

Cell Animation Workshop

During this workshop we were taught the basic principles of cell animation and began the process of creating our own 3 second animation. WE began individually by creating some quick, simple characters that we might use, I kept to bold shapes and gave them bold features which would allow me to use these during the 3 second animation.


I chose a character which I wanted to work with and began to look at it from different profiles as well as looking at possible movements it could make.


We then went into pairs where we joined our 2 chosen characters together in order to create the 3 second animation. Here is the beginning, middle and end concept for ours:


It begins with the bird entering the screen top right and then flying horizontally across the screen before exiting top left, during this time the pair of eyes will simply follow the bird across the screen, before waving goodbye at the end...

Once we had created the individual 36 A4 sheets I then scanned the images into Photoshop, cropper them as best I could using the crop marks we had drawn in and then imported the sequence into AFter Effects. Although the outcome is very simple and crude it taught me how to use After Effects and I learnt a lot about the settings and so on which will prove very useful for my actual story board. Below is the 3 second clip we created:


Looking at Narratives

After looking at the possible story concepts I decided to see how they could be all put together, and what sequence would flow best. After demonstrating this I decided that using all 4 concepts would be unlikely to work successfully due to the large content over a short amount of time.


I created a small brainstorm to see where I was heading next, it included the concepts which I decided would be more successful to use in the 30 second animation and the idea I had which involved starting and ending with the same frame or a similar one. For example as you can see below, I would begin with the character walking along the beach holding an ice cream, then in the middle section he would lose the ice cream and lose his hat through a series of incidents and then to end he would (some how) get an ice cream again and be walking along with it... 


Once again I created another brainstorm to decide how I would get the character to be holding another ice cream again, I came up with a few plausible possibilities and at the moment have settled on the idea of a second character who will enter, walking from the opposite direction with 2 ice creams, 'talk' to the first character and then give him one of those ice creams.

Wednesday 30 March 2011

Concept and first look at Possible Narratives

Once I had collected all the ideas from my brainstorms, I collated the most common, interesting and favourite ideas of mine that I wished to continue looking at. I also used the 3 descriptive words and put them all together to help create a concept for my animation.


Using the ideas I had come up with I begin to simply create some short ideas for sections or possibilities to be extended. I looked at using the main props/items I had already considered and applying them to the descriptive words, the idea of continuous movement - walking along the beach. Fluctuating, moving up and down with regards to the umbrella, the bee, the bird. However to meet "positive" as one of the descriptive words I need to create a much more positive ending to each of these short stories as at the moment they all have negative endings.

I feel keeping the ideas simple will be more effective in the long run and prevent over complicating and confusing the animation. I want to keep it punchy and clear with a sense of humour too.


IDEA 1. The concept of this idea is very simple; it involves the idea of walking along (continuous theme) and then the characters hat blowing off due to the wind. I would like to develop this sketch by involving the character chasing the hat, which could incorporate the 'fluctuating' theme due to the hat moving up and down through the air. 

IDEA 2. This idea involved two of the initial 'props' I had considered important/usable in the short animation. The idea of the character walking along eating an icecream (continuous theme) and then a bird flying (fluctuation theme) across the screen and knocking/stealing the ice cream.


IDEA 3. Here I have used the iconic red and white umbrella, which was one of the main images I had in my head during listening to the soundtrack for the first few times. The walking, once again is the continuous theme and then the being lifted into the air is the continuous theme. Obviously it would be much further expanded on if it was an idea I chose to develop. 

IDEA 4. This idea created a much more summer/happy/ positive theme I feel due to the rubber ring, although the bee is a large negative image. The continuity here is once again in the walking and then the fluctuating can be found in the movement of the bee. 

I feel I have unintentionally ignored the positive descriptive word which should be running through my animation. This however could become very prevalent if the short ideas became connected in some way. For example if idea 1 and 2 were put together:

-Hat blows away (negative)
- Character chases hat
- Hat falls right in front of an ice cream van/stall 
- Character buys an ice cream (positive)

This could end here or it could continue onto the next sketch and so on so that each negative ending leads onto a positive at the beginning of the next sketch. I would intend to end the entire movie on a positive note - (perhaps ending back where it began to complete the theme of continuity and humour??)

Mood Board

Using just a few images of Google, I selected some of the images that were coming into my head through my development of ideas. As crude as it is I feel it would help me communicate to others the sort of images I am seeing without using words. 


I feel it includes some of the main props and imagery I can see being included in the 20 second animation, whether they are used literally or not. It may be the case that I will be making these props out of clay and other materials, or simply using existing purchased items depending on the media I choose to use. 

The two main things that stood out to me through listening to the music were the trombone and the red and white umberella. Firstly the trombone/trumpet; though this is a very literal translation I just couldn't get the idea of a brass band playing at a traditional holiday resort such as Scarborough out of my head. Secondly the red and white umbrella. Through listening to the piece I could continually see red and white in my head and when I tried to apply this to an object I found it applying itself to items such as sun chairs, parasols, gazebos and the like.

Brainstorming

My piece of music is called Babel by Nortec Collective, I played my music on repeat and began to write down any ideas and words that entered my head, I found this piece of music quite difficult to describe and didn't find it particularly motivating at first, finding it difficult to describe through colours and images and so on. Below is my initial, general brainstorm for the piece of audio given.


Once I had created this I began looking over the words and chose the three words which I thought best described the piece and which also left some room for ideas and scope; i didnt want to be too specific such as colours, simply focusing on describing words for now. My three words are:

CONTINUOUS
FLUCTUATING
POSITIVE

I then moved on to creating a brainstorm for each of these 3 words, still listening to the music in the background to keep focussed on the piece of music.


I found common themes which seemed to be running through the 3 brainstorms, the idea of humour, a possible beach/promenade/holiday setting, birds/sky and perhaps a repetitive reoccurrence. The idea of a circus is still running around in the back of my head, although I don't think I'd like to do this as my main theme.

The pieces of information which I would like to focus on, as well as keeping to the 3 main descriptive words is the idea of:

- A traditional beach setting (British not foreign e.g Brighton/Skegness)
- The character moving up/down and moving continuously throughout the slide
- Perhaps elements of humour
- Birds flying (Seagulls may be more appropriate)